
Thursday, December 11, 2014
Bad News.
SO we just got some bad news about our 3d part. We resubmitted it a few days ago and just today, we got word that it can't be printed. Our only option now is to have it laser cut out of cardboard.
It's just an outline of the original idea. It's no more than 5 inches long. We need this part ASAP.

Servo.
Tobin, coded and set up his arduino to run a servo motor.
Here's is the code he used, it was found in an example on the arduino program on one of the school computers.
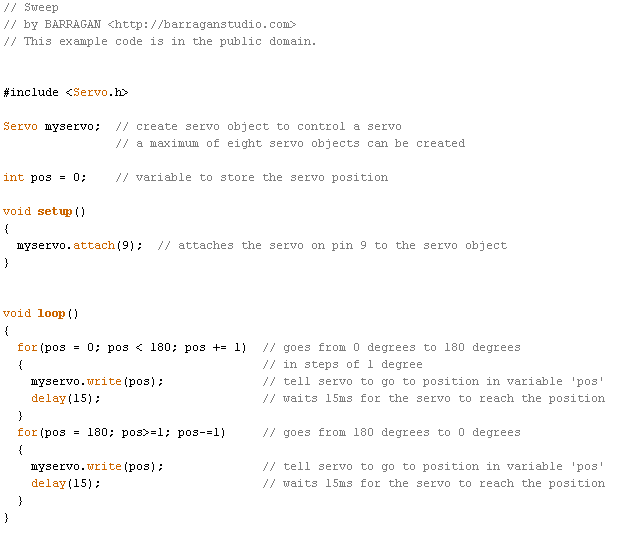
It runs beautifuly. It's just what we need to make our part rotate.
Here is a video if it below:
Here's is the code he used, it was found in an example on the arduino program on one of the school computers.
It runs beautifuly. It's just what we need to make our part rotate.
Here is a video if it below:
Tuesday, December 9, 2014
Crunch time.
Okay so, we had our request go in December 5th, it's now the 9th and we still hadn't got any word.
With the project due Friday, things are getting worrisome.
If we don't have it by Wednesday, tomorrow, we're just going to have to forgo the 3D printed part and make one out of other materials. It won't look as cool, but it's something, a prototype.
Hopefully it all works out.
*Fingers Crossed*
With the project due Friday, things are getting worrisome.
If we don't have it by Wednesday, tomorrow, we're just going to have to forgo the 3D printed part and make one out of other materials. It won't look as cool, but it's something, a prototype.
Hopefully it all works out.
*Fingers Crossed*
IDEA.
So after looking at that ferocious lighting effect, it started to look like a flickering fire to me. With that, I figured we could make use of that imagery and roast a pig! We could 3D print a pig on a rod and attach it to a servo to make it rotate on top of the LEDs.
Okay, I must admit, it probably wasn't the coolest idea, but with the failed LED cube and due date due on this project, I thought it made sense.
So after talking to over with the rest of the group, we decided to give it a go. Tobin used Solidworks to make the part and it turned out pretty fantastic.
We sent in the request to have it printed on Friday, December 5. 2014. Hopefully we get it soon.
Coding.
Now that I had something, I needed to code it to make it light it up. Instead of just blinking or lighting up I decided to have it sort of blink sporadically. It wouldn't have been boring. I found inspiration from an make use of post of a pulsating arduino LED cube.

It can be found here : http://www.makeuseof.com/tag/how-to-make-a-pulsating-arduino-led-cube-that-looks-like-it-came-from-the-future/
Once I programmed it onto my arduino, it actually lit. I can fiddle with the code to change its time constant which will control how fast it moves. The two videos below just show the speed differences of what I programmed the time constant to be, there's a slower one and a faster one. I also added a potentiometer to adjust the brightness of the LEDs. I can't really leave it on too high because there's a high chance if I did, the LEDs would blow out considering I only incorporated one resistor.
Here's a snapshot of it lit up
New Idea.
Okay so now that the LED cube is no longer in our plans, we needed a new idea. All I had really was that initial ground layer of the LED cube so instead of just wasting my hard work, I decided to just use it. I ended up wiring every LED to my arduino. I had 16 of them and just one resistor. That was probably a bad idea but I didn't want my bread board looking like a nest. I'll just have to be careful not to blow out the LEDs.


Failure.
So the cube attempt ended in a complete mess. I couldn't quite solder the layers on top of eachother without them falling into eachother. I don't have enough LEDs to start over and I really just have to scrap this idea of making an LED cube.
 Trial and Error. Many errors.
Subscribe to:
Posts (Atom)